To download a PDF copy of this manual, click on the file below.
Introduction
Welcome to your ML5 Midi Controlled Switcher. This is a MIDI controlled audio loop switcher that enables you to make your non-MIDI-capable effects part of your midi controller presets, giving you total control of your rig.
🎥 Watch https://youtu.be/9af1pEcpQPo for a video walkthrough and guide.
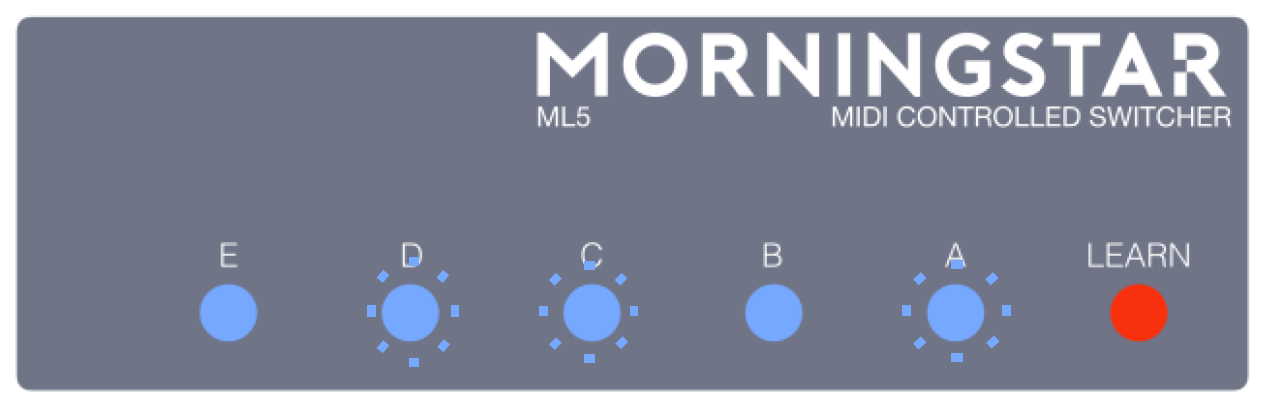
Front Panel

Switches A to E
Each of these switches represent the 5 audio loops available on the ML5. When a switch is lit, the loop is engaged and part of your signal chain. When a switch is not lit, the loop is bypassed and not in the signal chain.
Learn Button
Press this button to put the ML5 in learn mode. When the Learn button is blinking, the ML5 is in learn mode.
Side Panel
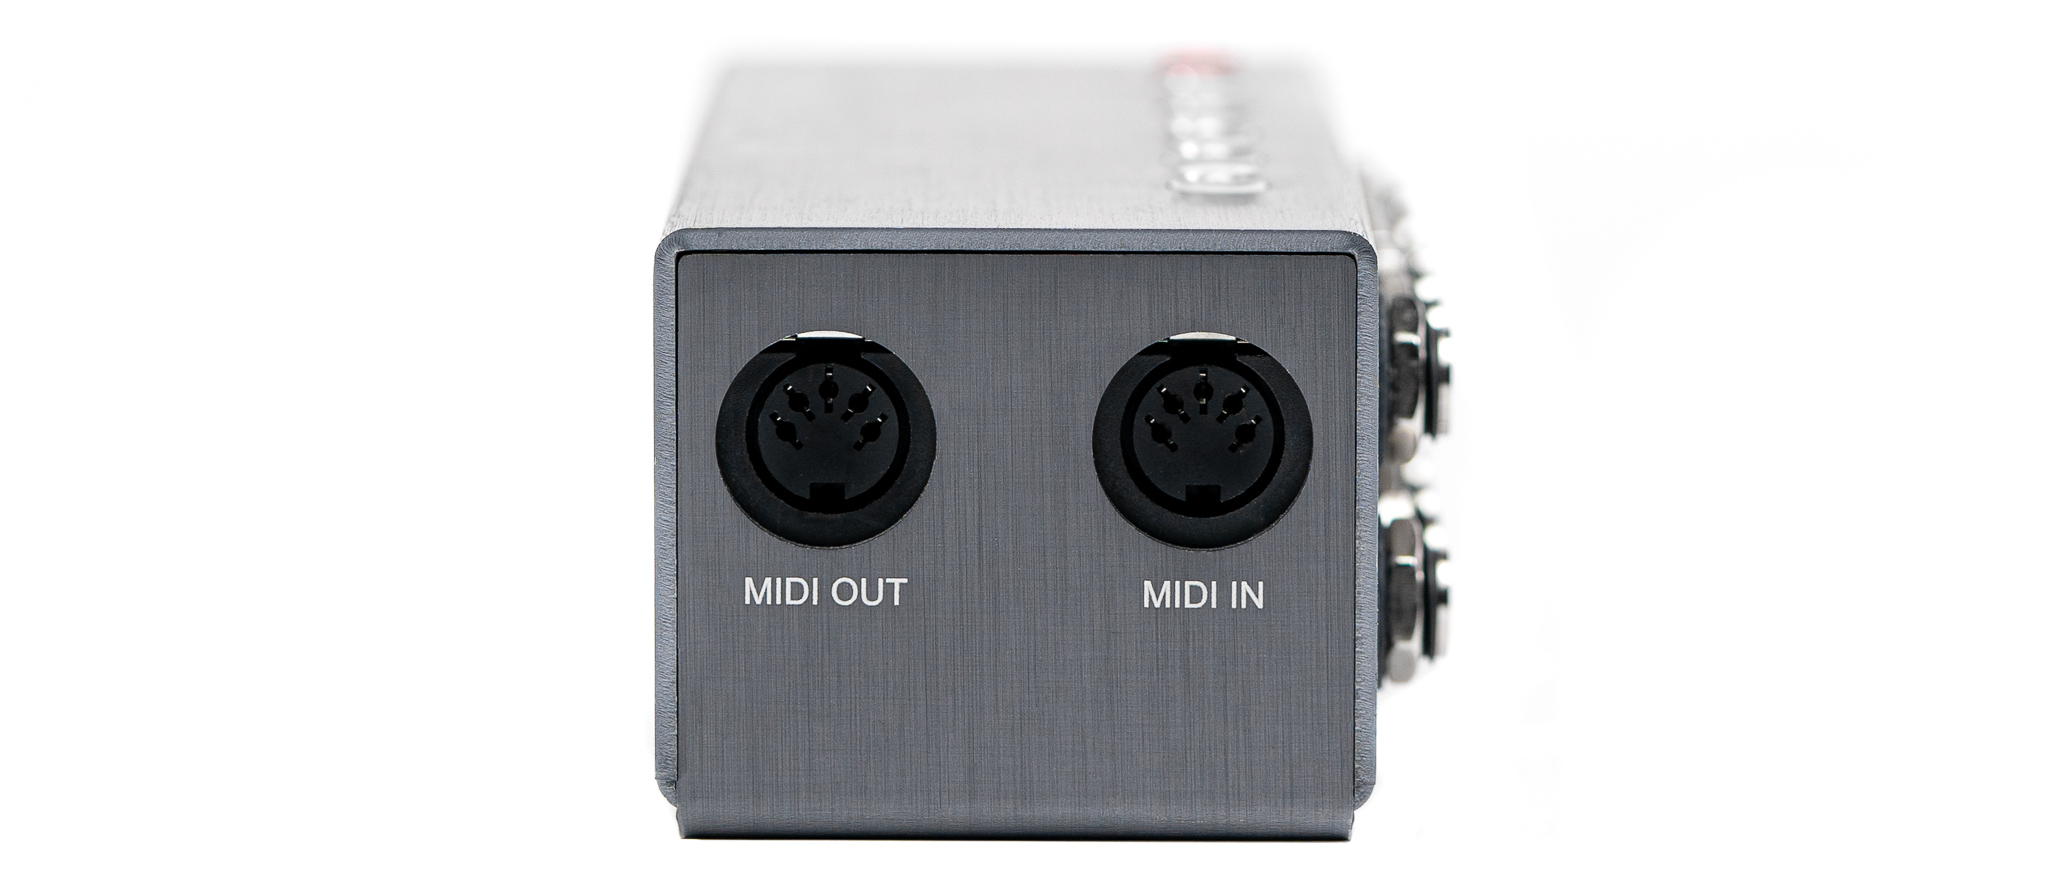
MIDI Out
This is where MIDI messages flow out/thru from the ML5. This allows you to chain the ML5 with other devices. The ML5 does not generate any MIDI messages itself.
MIDI In
This is where the ML5 receives MIDI messages.
Back Panel
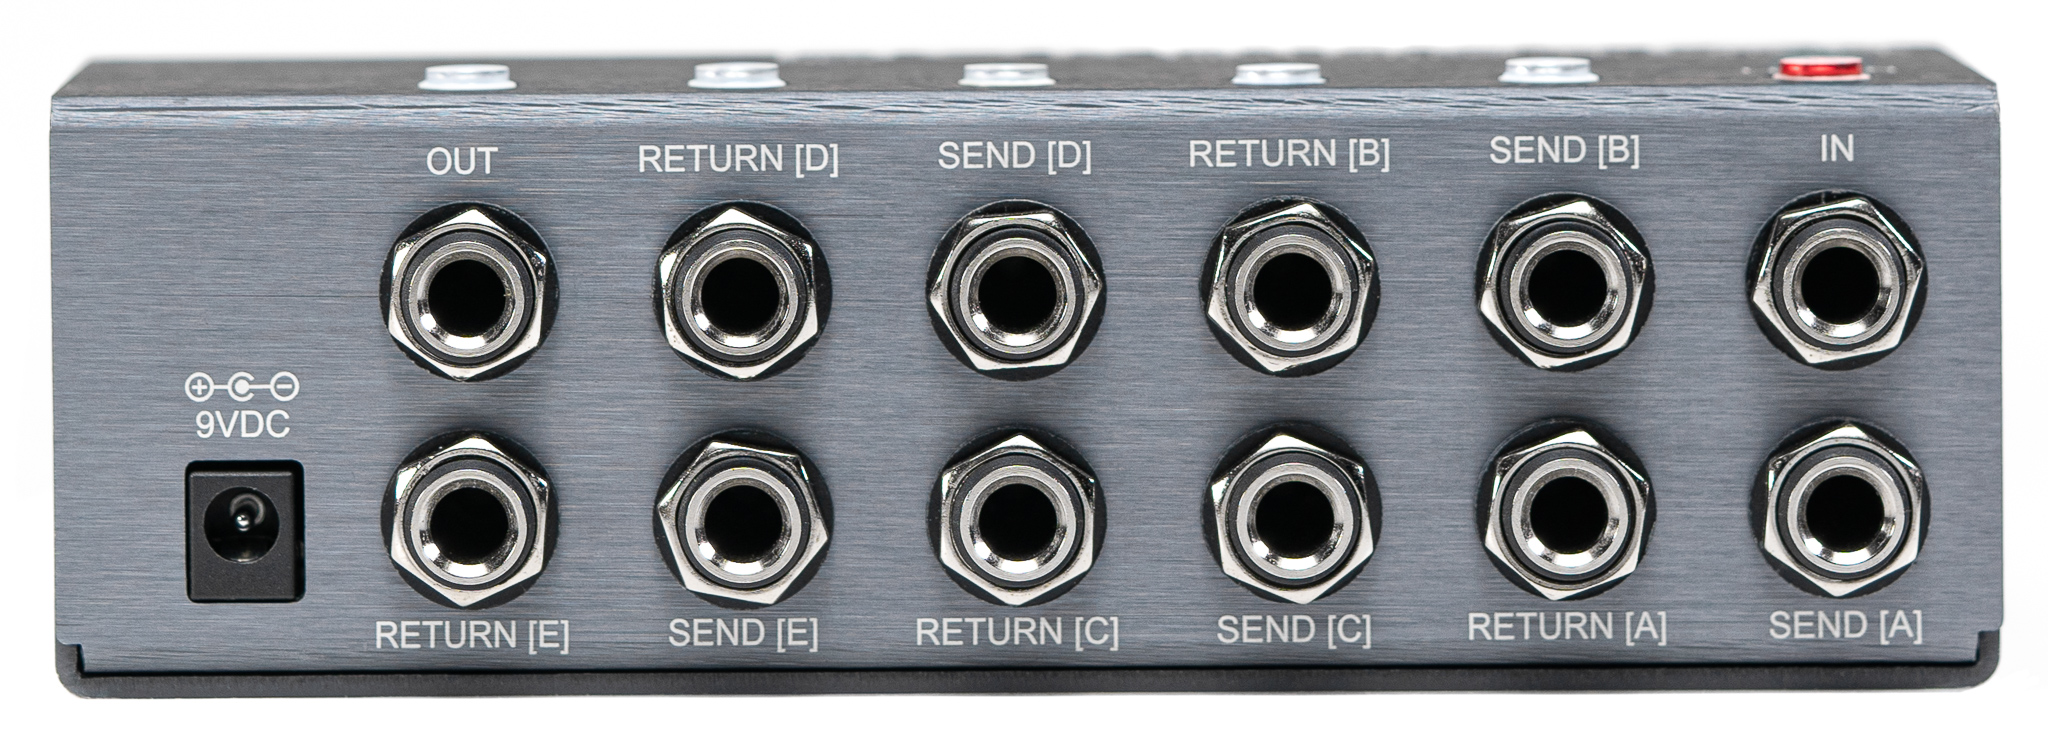
In
This is where the audio chain begins.
Sends [A] to [E]
Audio signal flows out from the sends. Connect the sends to the inputs of your effect pedals.
Returns [A] to [E]
Audio signal flows in from the returns. Connect the outputs of your effects pedals to the returns.
Out
This is where the audio chain ends.
9VDC
Connect a 9VDC center negative power supply here. The ML5 requires at least 160mA.
Saving a Preset
Saving a preset is simple:
Choose which loops you would like to be engaged in your preset. Do so by pressing on switches A to E. If a switch is lit, that particular loop is engaged. In the image above, loops A, C and D are engaged.
Press the Learn button. The Learn button will blink, indicating that the ML5 is in Learn mode.
Send a Program Change message of your choice from your midi controller. The Learn button will flash quickly, indicating that your preset has been saved. The selected loops will be engaged every time the ML5 receives the chosen PC message.
Global Settings
MIDI Channel
Choose what channel you want the ML5 to receive MIDI messages on.
Hold down Switch E while powering up the ML5. Once the ML5 is powered up, release Switch E. The Learn button will flash quickly and continuously.
Then perform any of the following:
Function | Description |
Switch A | Omni. The ML5 receives messages on all MIDI channels. |
Switches B to E | Sets ML5 MIDI channel to 1,2,3 or 4 respectively |
Send PC/CC message | Sending a PC or CC Midi message to the ML5 through a particular MIDI channel sets it to that MIDI channel. |
Muted Switching
Hold down Switch D before powering up.
The ML5 circuit is designed to keep switching noise to a bare minimum. However, you may have certain devices that are more prone to switching noise, such as devices that use an internal charge pump.
The ML5 has a muted switching function for pedals that may produce noise or a pop sound when engaged/disengaged in an audio loop. The audio mute can be applied to specific loops, such that the signal mutes only when those loops are being switched. The audio mute is applied to all loops in the factory default settings.
To edit your muted loops, simply hold down Switch D before powering up your ML5. Once the Learn button is lit, release the switch, and the Learn button will blink continuously. Also, loops that have are programmed to be muted will engage (blue LEDs will be lit). From here, simply select the loops you want muted, and then press the Learn button to save the settings.
Muted Switching Timing
Hold down Switch C before powering up.
The timing of the mutes can be set. Simply hold down Switch C before powering up. Release the switch once the LEARN LED lights up, and it should start blinking. Select between the shortest delay (Switch E) and longest delay (Switch A).
PC Toggle
Hold down Switch B before powering up.
The ML5 can be set to toggle between bypass and active by sending a PC message that engages the currently active loops. For example, if loops A, B, and C are active, and if you send a PC message that is set to engage loops A, B and C, those loops will bypass instead. By default, this setting is disabled.
To toggle between this setting, hold down Switch B before powering up. The LEARN LED should blink to acknowledge the setting.
Note: This feature was set to be permanent for the early batch of ML5s (Serial number less than #10020). However, we do acknowledge that not all users appreciate this feature. Please email us with your order ID and ML5 serial number, and we will send a newly-programmed chip over. You’ll just need to swap the chip out with the new one.
MIDI Implementation Mode
Only applicable to ML5s built from 2020 onwards
Hold down Switch A before powering up.
The ML5 has 2 separate MIDI implementations, which can be toggled between by holding down Switch A before powering up. The Learn LED will blink to acknowledge the setting. The MIDI implementation can be referring to at the bottom of this manual.
Factory Reset
Hold down Switch A, C and E while powering up
This will erase all your preset settings to the default settings, as well as set your MIDI channel to 1.
MIDI Implementation
All ML5s use Mode 1 by default.
ML5s built from 2020 onwards can toggle the MIDI implementation modes by holding down Switch A before powering up.
Mode 1
CC Number | Function |
0 | Values 0-63 Bypasses all loops |
| Values 64-127 Engages all loops. |
1 to 5 (corresponds with Loops A to E) | Values 0-63 Bypasses the individual loop |
| Values 64-127 Engages the individual loop. |
6-10 (corresponds with loops A to E) | Any value toggles the individual loop on and off. |
Mode 2
CC Number | Function |
9 | Values 0-63 Bypasses all loops |
| Values 64-127 Engages all loops. |
20 to 24 (corresponds with Loops A to E) | Values 0-63 Bypasses the individual loop |
| Values 64-127 Engages the individual loop. |
25-29 (corresponds with loops A to E) | Any value toggles the individual loop on and off. |